Tuesday, January 24, 2012

Yeast Starter

If you're using dry yeast from a packet, you can basically skip this post. The reason, given below, essentially boils down to the fact that if you're making a normal gravity brew, one packet of dry yeast has enough viable cells to start a healthy fermentation. If you're using liquid yeast, for example from Wyeast or White Labs, or using a small number of yeast either from a frozen vial or used yeast cake, things get more complicated than simply dumping the vial or package into the wort. While dry yeast offers a number of strains to generally get the job done for a number of base styles, liquid yeast offers an astounding number of strains with differing tastes, attenuations, speeds, optimal temps: basically everything needed to tweak a recipe. I've used some theoretical data below from MrMalty and YeastCalc as examples for using liquid yeast and how/why to build a starter, which both are backed up by empirical data. Whatever. Graphs. How can you argue with that?

Yeast Viability

Yeast viability is what determines if you need to prep more yeast or are good to go. Viable means healthy, live cells, and it differs over time and the form yeast are stored in. The graph below gives us a place to start, the recommended number of viable cells needed to pitch into a beer with a certain gravity. We'll assume a batch is 5 gallons.


As you can see, the number of cells needed for a proper pitch varies with the amount of sugar in the beer. While this is a guideline, as a homebrewer you really can't pitch too many cells. If you do, what you may get is a very active fermentation, but not a bad beer. It's not cheap to make a huge yeast starter, so going by these guidelines is a good starting place.

For these examples we'll use an average wort gravity of 1.055, or a pitch of 200 billion cells.

Ok, yeast viability. I mentioned before that dry yeast generally has more viable cells per packet and last longer in storage than liquid yeast, based on the process by which they are stored. The graph below demonstrates the viability of dry and liquid yeast from date of manufacture.


As you can see, dry yeast packets (11g) generally do not lose a lot of viability over time if stored at 4C, and is a good amount for pitching to our example beer. Liquid, on the other hand, starts at 100 billion at the date of manufacture (half the recommended pitching rate), and decreases steadily over time. In fact, given a package date at 3 months past manufacture (what you may find at your homebrew store), the number of viable cells may only be around 32% of the total, which is only around 16% of the number of cells you should pitch for a healthy fermentation! White Labs and Wyeast will disagree, and to a point, they are correct. Pitching this amount into a 5 gallon batch will make beer, and it may be fine, but the time it takes for the population to build invites bacterial infection outbreaks and stresses the yeast to the point that off flavors might develop. To build up a healthy, larger population, the answer is a yeast starter.

The Yeast Starter

There are a number of ways to go about making a yeast starter, some easy, some complicated. Since I've only ever done it one way, I'll go into that. Basically, you want to take the starting yeast population and grow it using pre-boiled wort from dry or liquid malt extract. The real trick is how you help the growth along. Below is the basic setup for a starter.

100g (3.5 wt oz) dry malt extract (or 4 wt oz of liquid extract)
1/2 tsp yeast nutrient
1 Liter water
Glass jug, mason jar or erlenmeyer flask big enough to hold around 2-4 Liters

Sterilize everything that you will use to make this starter. Boil the water with malt extract for 10 mins or so. Cool it to room temp and you're now got a simple wort around 1.035 specific gravity. I usually make a gallon of the stuff and sterilize it using a pressure cooker in mason jars so I can have some ready whenever I need it. The amount of wort that you make and when depends on how you will grow the yeast.

Yeast Growth

Using the assumption that we will be using these yeast for a 1.055 gravity 5 gallon batch, we'll need around 200 billion cells. There are 3 basic strategies that most people use to grow a starter:

Simple Starter (No Shaking) - Basically you add the yeast to a certain amount of starter wort, and let the yeast grow on their own. This is the least effective method to grow a good population.
Intermittent Shaking - Strangely enough, simply shaking the culture whenever you walk by it effectively increases the amount of yeast per volume of wort. Obviously, it depends how often you walk by, but the idea is to keep the yeast suspended as often as possible.
Stir Plate - Using a lab-type magnetic stir plate, you use a magnetic bar that spins in the wort and constantly keeps the yeast suspended. This greatly increases the cell count per volume, and can be found relatively cheaply on Ebay, or you can make your own.

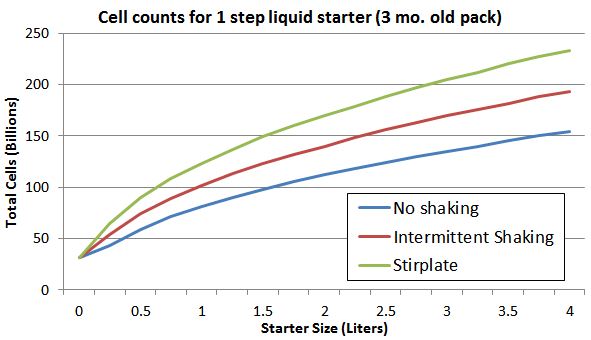
The graph below gives you an idea of how many cells you might have using a simple 1-step starter, meaning you use say 2 Liters of wort, dump your package of yeast into it and do nothing else beyond the the above scenarios.


Essentially, if you shake the flask once in a while, you'll need around 4 liters of starter wort for our theoretical beer. If you use a stir plate, you only need 3 Liters or so. Not a huge difference, but wort ain't cheap either.

Now a way you can increase cell count given a certain volume of wort by increasing the cell density in the wort by chilling the yeast and decanting the used up wort after the yeast have eaten all the sugars (usually take a few days). These are called steps, and I've laid out the same specs below, using 1.75 Liters total at steps of 0.25L, decanting then adding 0.5L and growing, decanting all that and adding 1L and growing it up.


Instead of using 4 Liters through intermittent shaking, you only need 1.75L of starter wort if you use these steps. It might take a bit longer, if you include the overnight chills to decant the used wort, but you've essentially cut your wort in half. Using a stir plate essentially allows you to use less wort overall, so it's something to be considered. It also grows a lot faster as well.

Beyond using a hemocytometer and a microscope to actually do cell counts to confirm your growth, you can monitor your starter using a hydrometer. You'll likely see a final gravity around 1.010-1.015 once the yeast have gone through it.

Culturing Yeast

A good way to save money for brewing is to keep your yeast stored. There are 2 main ways to do this, either keeping frozen cultures or plating on agar plates or washing the yeast from your last batch of beer. Washing yeast is really easy, and if you have room in your fridge for a few mason jars, you can easily save $7 per brew, and immediately start with enough yeast without the need for a starter. You can get about 5-6 generations out of a pack of yeast, so if you do the math that's about 30 5 gallon batches per pack! I'll get into both of these techniques later...


Monday, January 16, 2012

Water

Seems simple enough. H2O.

However, brewing water gets much more complicated, and it's really as complicated as you want to make it. Water contributes quite a lot to the taste or perception of a beer's taste based on the style, as well as helps control the mash pH. Personally I've taken a very gradual approach to optimizing (or even understanding) the effects of the water profile on my beers. I started simply using spring water from the grocery store. That worked well enough, especially for extract brews, but as I learned more about the mineral content needed for controlling mash pH, maintaining yeast health, balancing bitterness and maltiness to name a few, I began to understand how far I was undershooting some important stuff.

The first thing to do when you start to work on your water profile is to find out what's in your water to begin with. If you're using tap water, check out your local water report. It will usually have all the pertinent mineral data. If you're on well water, you can get a cheap report from Ward Labs. You can find the water report for most commercial spring waters online, but those are usually very soft, or low in mineral content. Distilled water is good for bringing the hardness and minerals down in hard tap water since it has no dissolved solids.

If your city water uses chlorine, you'll have to pre-boil it to remove it. If they use chloramine, however, adding  one Campden tab (potassium metabisulfite) per 20 gallons of water will remove it. For the most part, simply doing this will suffice for extract brewing, as a lot of the minerals needed are in the malt extract. If you're doing all-grain, it will greatly improve your control on the taste of the brew if you focus in on the specifics of your water's minerals.

Below is a list of the ions in water that are important for brewing. I've listed some recommended levels (in mg/L or ppm), as well as adjusted levels for certain types of beer styles:

Calcium (Ca++)
Very generally, calcium is important for lowerin mash pH to desired levels, as well as increasing yeast yield and growth, enhancing yeast flocculation and assisting in protein coagulation in the hot and cold breaks, among others. A rule of thumb is that the calcium ion concentration should be somewhere between 50-100ppm.
Can be supplemented using Gypsum (CaSO4) if the water is low in sulfate, or calcium chloride (CaCl).

Magnesium (Mg++)
Magnesium is goof for yeast health and flocculation, and in a lesser amount decreasing the mash pH. The nice thing is that most of the Mg should be extracted from the extract or the grain during the mash, so typically an addition is not needed. Starting levels should be between 5-30ppm.

Sodium (Na+)
Levels should be less than 100ppm or so. If your water report has extremely high levels, it could likely be due to water softening agents. If this is the case, either dilute the water with distilled water to bring it down, or try to source the water before the softening. High levels above 150ppm may give a slightly salty flavor to the beer.

Chloride (Cl-)
Not to be confused with chlorine, chloride accentuates the sweetness or maltiness of a beer, and should be present in levels between 10-100ppm. Historically, people who added a touch of table salt to domestic lagers attempted to bring out some maltiness in the flavor.

Sulfate (SO4--)
Sulfates provide a sharp hops bitterness, and levels should not exceed 150ppm for most beers. There is a debate about choride/sulfate ratios and its effect on the bitter/malty flavor. I generally balance the ion concentration of both within their normal limits, and occasionally shift the balance one way or the other depending on the recipe. An easy way to do this is using gypsum and calcium chloride, which both boost the calcium level, which is a good thing anyway if it's lacking.

Carbonate (CO3) and Bicarbonate (HCO3)
These ions are mainly important in mash alkalinity (pH buffering capacity), stabilizing and preventing a decrease in mash pH. While this is usually never a problem for most all-grain brewers, too much carbonates will not allow the pH to reach the desired 5.2-5.4 range, especially in light beers where unadjusted water does not have the acids present in highly kilned malts to neutralize the bicarbonates. Generally, light beers should have a level less than 50ppm (converted from CaCO3 if reported as such), and can be balanced with Ca/Mg to reduce the residual alkalinity (below). Very dark beers may need elevated bicarbonates to counteract the acids present in dark grain grists.

Residual Alkalinity (RA)
Residual alkalinity is a measure of both permanent water hardness (Ca/Mg) and Alkalinity (carbonates). Basically, Ca and Mg neutralize the water alkalinity by interacting with the phosphates present in the malt, while bicarbonates contribute to it. Residual alkalinity (expressed in ppm) is a rough indicator of where the mash pH will end up. The chart below shows the general relationship between hardness and alkalinity, and also demonstrates the use of darker malts (of Dublin, for instance) that counteract high alkalinity, and lighter beers (from Pilsen) that have low RA to start. If you can't combat the high alkalinity, you might also consider adding 1-2% acidulated malt to lower the mash pH.

Below is a chart from AJ Delange, an expert in brewing chemistry, showing this RA relationship among common regional water profiles. Note: Take these city water profiles with a grain of salt, as not many people know how the specific breweries treat their water and the levels may be inaccurate. In short, don't try to imitate a water profile exactly to copy a certain style.


Summary

The main takeaway here is that water chemistry can seem daunting, but is not overly complicated for homebrewers. As a extract brewer, I would suggest getting a water report if using tap water to ensure the levels are not way off. If they are, dilute with distilled water, but do not use all distilled or reverse osmosis water, as you need some ions in there. If you want to play with the concentrations, start with a small amount of gypsum and calcium chloride, no more than about 0.5 tsp of each to 5 gallons before the boil. These are your main flavor components. Adjust with recipes, higher on the sulfates for bitter/hoppy beers, higher on the chlorides for maltier beers.

For all-grain brewers, it would be useful to understand the water chemistry a bit more, and estimate your mash pH and ion concentrations. A good source for this is Bru'n Water, which is a great overview a free Excel calculator for estimating your mash and ion components. It takes a little while to get used to, but it's a great way to start. A pH meter might also be helpful on brewing day to ensure you're getting the right levels.

Sunday, January 15, 2012

Yeast

In my opinion, how you treat your yeast before and during fermentation has the greatest effect on the quality of your beer. This is one of the big reasons starting with extract brewing is so useful. By focusing on the fermentation, "pitching" proper amounts of yeast, controlling temp, and you've figured out about 90% of how to make a great beer.

Yeast, specifically brewer's yeast or Saccharomyces cerevisiae, multiply by budding off new yeast through asexual reproduction. They are essentially copies of themselves. So much around using yeast for brewing has to do with pitching rates, and controlling the growth process. The idea is to pitch a certain number of yeast so they go through a very particular growth cycle:
During lag phase, the pitched yeast cells are equilibrating to the new environment and preparing for division, at the same time the new brewer (and experienced, for that metter) is anxiously awaiting fermentation to start. In brewing, this can be anywhere from 5 hours or less to 72 hours, depending on the culture, health and nutrients available. The most common question you hear from someone just getting into brewing is "are my yeast dead?" Yeast can get stressed from any number of things, from temperature swings, osmotic pressure changes, pitching at too low a density, etc. If you treat the yeast well and follow a few simple rules, the lag time should be very short, less than 12 hours.

Log phase is where the greatest amount of reproduction is happening. This requires 2 main things: nutrients and oxygen. During this time a population can double every 2-3 hours, so you can reach full density very quickly. During lag phase and into stationary phase, the temperature may swing from 5-10F higher than the ambient temp in the room, so it can get out of control very quickly. Though it makes sense that you pitch enough yeast to start fermentation directly, log stage is very important in building cell strength, health, as well as contributing many of the flavors to a beer so specific to that yeast type.

Stationary phase is anaerobic (no oxygen) and where most of the fermentation happens. When your airlock starts to bubble, you're into fermentation and the sugars are being converted into ethanol and CO2. While it's not recommended, you can easily track the progress of fermentation by watching the bubbling rate of the airlock. I'd generally say if the airlock is bubbling, that's good news, but if it's not, you'll have to check the gravity to see if the CO2 is getting out via some other path or the fermentation is truly stalled. More on that later.

Dry or Liquid?
Brewer's yeast comes in two forms, dry and liquid. There are specific benefits of either form, and of course disadvantages. Dry yeast is often cheaper than liquid, stays quite viable in storage and has more cells per package (good enough for a 5 gal batch), but is only available in a limited number of strains (ie, less control on flavor profile from the yeast). Beyond that, preference for one or the other are often personal preference. I prefer to use liquid yeast due to my experience with certain strains, but I started with dry yeast due to ease of use. Good beers with dry, good beers with liquid. The problem with liquid is that you are never provided an ideal amount of yeast to pitch for a batch in a package. Using a yeast starter, however, that problem is solved.

Outside of flavoring and fermentation specs, yeast are typically characterized by 4 main things:

Attenuation

Normally from around 65-80%, "apparent" attenuation states the average percentage of the malt sugar that can be converted into ethanol, depending on the fermentability of the wort. It's not a huge range, but small differences in residual sugar remaining in the brew after the yeast have finished will have an effect on the taste. For example, a yeast with low attenuation, in the 65-70% range, might ferment a 1.050 beer down to 1.018. A highly attenuative strain, in the 75-80% range might get you to 1.010 on average. Tweak the fermentability by adding more or less simple sugar (we'll cover this in mashing), and you can really dry out a beer or keep it very sweet and malty. The point here is that choosing a strain with the attenuation you want can get you a very distinct flavor. Calculating and estimating apparent attenuation is easy, given the example above:

% Attenuation = (original gravity - final gravity) / original gravity = (50 - 18) / 50 = 65%

Temperature

No shocker here, certain strains like certain temps to ferment optimally. This can be broken down into 2 categories: ales (62-70F) and lagers (48-59F). There are also hybrid strains that like mid ranges as well, such as kolsch yeast. As a general rule, you can avoid any potential off flavors in the beer from stressing the yeast by keeping the temperature of the fermentation at the low end of its range. The cooler you keep the yeast the slower it will ferment, but if you push the temp too high, the yeast will stress quite a bit.

Flocculation

Given in low, medium and high, flocculation is the ability of the yeast to clump up and fall to the bottom of the fermenter. Higher clumping will lead to clearer beer, but also may result in stalled fermentation by falling too quickly if not pitched at the proper amount. A low floccing yeast will leave a very cloudy beer typical of weizens and wheat beers.

Alcohol Tolerance

Most commercial yeast strains these days have very high tolerance to alcohol levels. It might be good to take a look at the rating before brewing a big beer, but most have a tolerance of at least 10% abv. There are imperial-type yeasts and champagne strains that would work well for high gravity beers.


Friday, January 13, 2012

Hops

Hops are what gives beer that distinct flavor and bitterness.

Surprisingly, hops is the one part of brewing that is fairly uncomplicated. Yes, there are somewhere around 75 different popular varieties of hops, and they each have their own "flavor", but deciding on a particular kind for a recipe is often quite simple.

Alpha Acids

The resin of the hop flower (or cone) is made from the lupulin gland of the hop. If you look at a flower, you can see a nice pile of yellow pollen-looking deposits. This is the good stuff. The main acid that makes up the resin is called alpha acid. There is also a beta acid in a lesser amount, and these do not impart bitterness or a lot of taste to the brew. For good reason, as hops with high beta acids can really screw up a beer.

The general rule is the higher the alpha acid content (usually maxes out around 16-18%) and the longer the hops stay in the boil, the more bitter the beer will be. This is imparted by the isomerization of the alpha acids in the boil, which is basically how bitterness is measured commercially. The amount of bitterness of a brew is given in International Bittering Units (IBU). Really clever name. A beer that is low in bitterness, like a wheat will be around 10-15 IBU, while a heavy beer like an IPA may have upwards of 75-100 IBU (which is the theoretical threshold of bitterness that we can taste).

The nice thing is that although different varieties of hops have slightly different flavors, even as a bitter hop, the bitterness they contribute is fairly easy math. Very generally, it is:

IBU = Bigness Factor (like gravity) * Boil Time factor (like boil time) * mg/ml of alpha acid

Software is the best way to determine this, as it has to do with the gravity of your wort (or how much sugar is present), so you change one thing and they all change.

Flavor and Aroma

This is where it gets a little more complex, and a lot of it has to do with personal preference. Flavors of hops vary from being earthy, piney, citrusy, sharp, floral, grassy, woody, spicy, clean...you name it, there's a hop for it. Some new strains are now being popularized like Citra that has a distinct passion fruit flavor and aroma. The list is too long to go into here, but when I mention a certain hop for a recipe, I'll state why I used that one over another, and some substitutes that are very similar.

Hop Schedule

You basically have 3 different ways to use hops in the boil: bitterness, flavor and aroma. To get the full bitterness out of a given amount of hop you want to add it at the beginning of the boil. Therefore it makes sense to use a high alpha acid hop for the boil. Hops are not exactly cheap, and depending on the recipe and the variety, it can easily make up 20-30% of the cost of a brew. Flavor components typically come mid-boil, in the 15-30 minutes prior to flame-out range. Aromas come from adding the hops with a very short boil, around 0-5 minutes before flame-out. To get even more aroma, hops are often added directly to the fermenter after the main fermentation is complete, called dry hopping. You also have a long list of cool ways to up the hops aroma like using a hopback after flame-out or Randall (Dogfish Head) that infuses the beer with fresh hops on it's way out of the keg into your glass. Awesome.

Pellets, Whole Leaf, Fresh, or Plugs?

Pellets are the most common form of hops for the homebrewer, although many prefer whole leaf or even fresh. Pellets are compressed, shredded leaves that are relatively easy to deal with and store. Whole leaf hops are just that, dried and cold stored cones that you dump right in like it was off the vine. It doesn't take any other calculation differences, only the leaves soak up much more wort when separating them after the boil, so that has to be accounted for. Fresh hops are taken during the harvest in the fall, so they are only used around that time. These hops are not dried, and often give a very earthy, grassy tone to the brew. Plugs are pretty rare these days, but they are still around, and people still use them. Some think that the pelletizing process causes too much degradation to the lupulin glands and compromises the quality of the hop. Whatever, they make good beer. 

Malt

The grain bill of a beer contributes most of the flavors of a particular style. Almost all beers have some percentage of barley as the base material. It contributes the enzymes (diastatic power) needed to convert the raw starch into sugar, and by kilning the grain you can extract very different flavors from the same base grain.

Malting allows the grains to generate the enzymes needed to convert the starch to sugar. Very simply, the grains are allows to germinate by soaking in water, after which they are kilned, or heated, to stop the germination process. The heating process can be increased to create a range of flavors from caramel to dark chocolate or roast. SRM (Lovibond) is a standard way to estimate the color profile it will contribute to a beer, and it can range anywhere from 1.5 (very light) to 500 (very dark), and anywhere in between. The process of darkening the malt can also vary. Some of the grains below can be simply steeped in water prior to the boil (for extract brews) to extract the flavor of the grain, and some must be mashed to take full advantage of the sugars present.

I’ve laid out here a number of commonly used grains by what they contribute to the beer as well as how they are typically used.

Base Malts
Base malts make up the largest portion of the grain bill, often 50-80% or even higher in simpler bills.

2-Row Pale Malt
SRM: 1.5-3L
In a typical beer, this malt makes up the greatest portion of the grain bill. Pale malt is light in color, and has a high amount of diastatic enzyme needed to convert the starch. A mash is required to convert the sugars. It imparts a crisp malt flavor, and is the backbone of most malt extracts. There is a wide variety of pale malts, from the very simple 2-row to more complex Maris Otter, which imparts a toasty, maltier flavor to the brew.

Pilsner Malt
SRM: 1.5-2L
This malt has the lightest color and flavor, and is often the base for most of the light Czech and German styles. Some less modified Pilsner malts may need a protein rest in the mash, basically a short rest at a lower temperature around 120F before saccharification, to break up the long chain proteins that lead to a slightly cloudy beer.

6-Row Malted Barley
SRM: 2L
This malt is similar to 2-row, but it has higher enzyme levels, which  makes it ideal for use with the adjunct grains below that lack the enzymes necessary for start conversion. While this is not a base grain in itself, it should be used when a lot of grains with low diastatic power are used.

Munich Malt
SRM: 10-60L
These malts are kilned at a slightly higher temperature than pale malt, and often used in combination with the base malts to add a malty sweet flavor. Mashing is required for use.

Vienna Malt
SRM: 3-5L
This 2-row malt is kilned to a color somewhere between pale and munich, and provides a toasty, biscuit flavor to the beer. It can be used in addition to pale malt or as the full base grain bill.

Specialty Malts
These malts range from highly kilned or modified malts, contributing to mouthfeel, maltiness, body, flavor and color.

Crystal Malt
SRM: 10-150L
With such a high range of colors, the flavor impacts of crystal malt can vary based on which SRM you use. This is also a great malt to increase body with a caramel, malty flavor in an extract brew because they can be steeped, no need for a mash. Using a liquid heating step in the process, most of the starch in crystal malt has already been converted into soluble and caramelized sugars. Crystal malts with a higher Lovibond rating have darker color and a richer caramel taste, ranging from light malty (10-40L), caramel (40-80L) to a dark raisiny flavor (80L-120L). This malt should not be used too high, maybe around 5-15% of the grain bill due to the high protein content that can contribute to chill haze in a beer.

Chocolate Malt
SRM: 300L
Another great malt for extract brews, as most of the enzymes have been denatured due to the high kiln temperature. This malt produces a rich flavor and considerable darkness. The flavor and color are easily extracted by steeping, leading to the basis of some easy-to-make porter recipes. This malt also contributes very little sugars to the wort, and should be used sparingly, around 2.5-5% of the grain bill. This is a great base for color and flavor in stouts and porters.

Black Patent and Roast Barley
SRM: 300-500L
These two grains are kilned at very high temperatures and contribute a strong roasty taste. Be careful, as the taste becomes acrid if you use too much. Both work well in extract batches, especially stouts.

Cara-Pils and Dextrin Malt
SRM: 2L
These varieties have a very complex starch content, which gives it the ability to increase head retention. When mashed, diastatic enzymes solubilize the dextrins into the mash. However, the dextrins are unfermentable, leading to a sweet, high final gravity beer, such as cream stout. I’ll use this at a standard 5% of the grain bill to keep the foamy head around after the pour.

Malted Wheat
SRM: 2L
Malted wheat is a key ingredient in weizen beers, and contributes a glutiny mouthfeel. The color is very light and is high in fermentable starch. It has diastatic enzyme and must be mashed.

Victory Malt
SRM: 25L
This malt is used to give a biscuity or nutty flavor, stronger than Vienna, but similar. I'll use it at 5-10% of the grist. Also imparts an orangish color. Needs to be mashed. Might use it to give a Maris Otter-type flavor to regular 2-row, if you're not excited about paying extra for "special" malt.

Rye malt
SRM: 4.5L
Malted Rye gives a spicy aftertone to the brew. I'm on a bit of a rye kick these days and put it in almost everything, anywhere from 0.5-2lbs per batch. It really balances well with a citrusy hop aroma. It must be mashed, or you can use rye malt extract for a similar flavor.

Adjuncts
Adjuncs are typically unmalted grains made through a variety of processes including flaking, torrification or simplyrefined starches.

Flaked Oats, Rice and Corn
Oats contribute a rich mouthfeel. Corn is lightly flavored, while rice is almost flavor neutral, leading to very light low-body beers. Corn and rice are very high in convertible starches, but they have no enzymes of their own. To use them they must be mashed with malt that is high in diastatic power.

There is a much longer list of specialty malts as well as base malts that add particular flavors to beer. These include honey malt, biscuit malt, smoked peat malt, etc etc, that would take forever to get into. I’ll dabble in these later as we go through recipes. They are all usually a low amount of the grain bill, but you can create very distinct flavors with them.

Malt Extract

Malt extract comes in dry (dry malt extract, or DME) or liquid (LME) form. Beyond that it gets pretty wide open, with varying kinds of starch sources, colors and flavors, but one point is common to all: malt extract is the concentrated, unfermented sugars for beer.

Malt extract is malt extract as far as I'm concerned, and everything else beyond "Pale or Light Malt Extract" is a bit of marketing. Essentially the base of all extracts is barley, which they use for much of the sugar converted as well as the enzymes to convert the starch to sugar in the adjuncts they add, such as wheat, rye, chocolate malt, and a long list of other types of grain that are either roasted so long their own enzymes have been denatured or not enough existed in the first place.

This page could be a long explanation of all the types of malt extract, what exactly they contain (if that information even exists), and how exactly to use them. No, this is instead going to be an explanation of how I use malt extract, which is much simpler than it seems.

From one online supplier, I see that they have 29 different kinds of malt extract. Yikes. From the very beginning of my brewing "career", I never used anything but pale malt extract. I learned this from some wise person on the internet, and I am passing it forward because there is some calming in it. For the bulk of my extract brews, I only used pale, golden, light malt extract. A exception there may be when making a wheat beer, the extract for which is typically 60/40% wheat to barley.

The reason for only using one type of malt extract is to simplify the recipe process. It takes quite a bit of time and patience to even make one brew, so why change everything in all of your recipes? There's no way to compare the difference and learn from it. Also, almost all of the differences between the malts, especially around color and flavor, you can do yourself by steeping grains before the boil. This gives you much more control over the process and recipe.

You may find a recipe somewhere that states "amber DME" or the like, and there's no problem in using that, except when you want to make it again and your brewstore is out of amber. Now what?

Keep it simple and for simple recipes with steeping grains, my recommendation is just stick to pale extract. We'll go over steeping grains, what can be steeped and what needs to be mashed later.

Dry and Liquid Extract

This is pretty simple, liquid extract is not completely dehydrated, and dry extract is. There are differences in these beyond that however. Dry malt extract is more concentrated than liquid (less water), therefore it takes less dry extract to give you the same amount of sugars compared to liquid extract. For example, it takes 7.25lb of liquid extract to give you the same fermentable sugars as 6 lb of dry extract. On the whole, however, the prices per sugar of each isn't really that different.

I lean more towards the dry extract camp because of 3 main things: 1) Depending on age, liquid extract can go bad faster than dry extract. This is not a big one, as the most common extracts will likely not be on the shelf that long, and good manufacturing takes care of these problems. 2) Liquid extract is easy to scorch in the brew kettle if you're not careful. Just be diligent of mixing during the boil and this should be a problem. However, because of the evaporation process of liquid extract, 3) it generally gives you a darker beer than you will expect, and scorching will compound that.

Starting Equipment

There are a few basic essentials that you need to start brewing. Since most homebrewers start with extract recipes, we'll go over these first.

Brew Kettle
Brewing from extract can be done with a relatively small brew kettle. Since you don't have to boil the full volume of the wort, a kettle as small as 3 gallons will work. The idea here is that you boil half of the water along with the extract and hops, and dilute the wort to the full volume with more water in the fermenter. While stainless steel kettles look nice, there is no problem using aluminum or a coated stock pot. If using aluminum, it is recommended that you boil water in it for 30 minutes or so to fully oxidize the metal. I'll go ahead and say if you're buying a kettle, go with at least 30qt so you can grow into it. It's much cheaper that way. And if they have 1/2" NPT ports on it, even better. You'll use those later.

Fermenter
Once the wort is boiled and cooled (we'll go over that), the wort is combined with fresh water in the fermenter before the yeast is added. Most commonly the fermenter is a 6.5 gal food grade plastic bucket with a lid. During fermentation, the yeast will produce CO2 along with ethanol, and that CO2 must escape out somewhere. The lid of the fermenter will have a hole with grommet that you stick an airlock into (below). The airlock creates a liquid barrier so that gas can escape the fermenter, but nothing can get in. Some people may start out fermenting in a 6 gallon glass or plastic carboy (commonly called a Better Bottle). A lot of discussion has arisen around what kinds of material are safe for your brew as well as create a good gas barrier. The main consensus is that food grade buckets made of PP or PE provide good safe protection for fermenting. The safe bet is to buy a bucket made for brewing from a homebrew store (links below). It it important to note that the fermenter should have a volume about 30% bigger than the volume of your wort, since top-fermenting yeast will create a "krausen", or a layer of active yeast and bubbles that will clog your airlock if it gets high enough. We'll get into how to avoid this later.

Airlock
As stated above, the airlock provides a one-way channel for the CO2 produced to escape. There are 2 common kinds of airlocks, the 3 piece and S-type. They both work just fine. It's not a difficult science (sorry Pasteur). If using a carboy, the airlock will fit into a rubber bung and fits snugly into the carboy opening.


Racking cane
Once the beer is done fermenting, you need to transfer it to a bottling bucket. This is easily done using a racking cane, which is a bent piece of stiff poly tubing. Attached to this is a 3-4ft piece of vinyl tubing. A siphon is created to pull the beer up through the cane and into the bottling bucket. Instead of a simple cane, you can use an autosiphon to start the flow, but I've always siphoned by mouth using a small piece of tubing on the end of the vinyl so I don't spit into my beer. Works just fine.

Bottling Bucket
Once the beer is done fermenting, all of the fermentable sugar has been eaten up, so you'll need to add a bit more sugar (dextrose) while bottling so the beer will carbonate in the bottle. A bottling bucket makes this very easy. We'll go into this step later, but by adding dissolved and cooled sugar to the bottling bucket before transferring the beer to it, you can mix the sugar at the same time. The bottling bucket is basically the same as the fermenting bucket, except it has a spigot at the bottom that you attach the bottling wand to. No lid is needed for this bucket since it will only be there for a few minutes, and it only needs to be as big as the volume of the brew.

Bottling Wand
This is one of those things that costs like $5 but makes bottling so much easier. You attach a piece of vinyl tubing to the spigot on the bottling bucket and over the end of the bottling wand. The wand has a little lever on the bottom that only opens up when you press it against the bottom of the bottle. When the bottle is filled, the wand is pulled out and flow is stopped, and the optimal amount of headspace in the bottle is created when you remove the wand. It sure beats slowly opening the spigot to fill each bottle, since you'll have around 50 bottles for a full batch.

Bottles
If you're not kegging, you'll need around 50 amber bottles without the twist-off cap. I say this because you can use any bottle that has a crown cap. So if you've got a bunch of used bottles out for recycling, you can remove the labels and use them instead of buying new ones. They should be thoroughly cleaned and ideally amber because it is most effective at blocking light that may damage your beer. Of course if you keep them in the dark, green or clear bottles work just fine too.

Bottle Caps and Capper
The crown capper is a nice little device that allows you to crimp new crown caps on your bottles. Pretty self-explanatory.

StarSan
Before your sterilized wort and finished beer touches anything, you'll need to clean and sanitize the hell out of everything. Most experienced homebrewers will tell you this is the most important thing about brewing. Your yeast needs the best chance of outgrowing any bacteria that may be present. There are a number of sanitizers out there, and all are very effective, but some are simpler. Iodophor and bleach work well to kill everything (well not spores, but good enough), but it needs to be thoroughly rinsed. Kind of pointless if you're running more unsterilized water to wash it off. I recommend StarSan. Any homebrew shop will have it, and the nice thing is that it is no-rinse. Just dilute however much you need for the day (I usually only use a gallon for a brew day, and I've been using the same tube of it for 5 years), soak everything for at least 30 seconds and drain it out. There will be bubbles left, but theoretically this stuff breaks down and turns into nutrients for the yeast. Good stuff.

Hydrometer
Specific gravity is how brewers tell how much fermentable sugar is in the wort and how far along fermentation has gone in the fermenter. We'll get into the specifics later, but this is an essential piece of equipment. Without it, you won't know when your beer is done fermenting or how much alcohol is in the brew. Hydrometers very simply measure the specific gravity of liquid. Any one made for brewing will work, but make sure they are in the 0.990-1.120 range.

Other Small Stuff
Other small items that you'll need, and may already have, are a large plastic spoon, brushes for cleaning equipment, and whatever else I missed that I'll include later during the process explanations

Starter Kits
Most homebrew shops sell kits that have everything you need to start, usually omitting the brew kettle. I've listed a few online shops to give you an idea of what they contain. You can go as complex as you want to start out.

Northern Brewer
Austin Homebrew
American Brewmaster
More Beer

Thursday, January 12, 2012

Homebrewing: Where to start?

In any hobby, you have veterans that most enthusiasts aspire to be, intermediates who think they are veterans, and newbies who are just learning the ropes. Either way you have to start from the beginning.

The brewing process is really quite simple. You start with sugars that are converted from starch in the grain during the mash, boil it to sterilize and add hops for bitterness and flavor, cool the "wort", and add yeast that converts the sugars into alcohol and CO2. Bottle it up and you've got beer.

That's the simplistic view, of course, but those are the basic principles. Vary the kinds of grain, hops and yeast (along with small changes in the steps), and you've got different styles. I'm one for jumping right in, so let's define the different types of home brewing:

Extract

Most people getting into homebrewing start with extract kits. This means that instead of having to mash the grain to convert starch into sugar, you are given a concentrated form of the wort that was mashed at the factory and evaporated down. These extracts are typically made from the base grains, or the grains that contribute most of the sugar in the mash. We'll get into specific grains later.

In this case, the brewer starts the process from the boil, adding the extract as if they had done the mash. While this is an easy way to jump into brewing, you'll pay a price of course for having some of the work done for you. Compared to mashing yourself using malted grain, you'll typically pay 3 times as much for extract to get the same amount of wort.

That being said, you have to crawl before you can walk, and focusing on the downstream side of brewing, sterilization, fermentation and bottling, is much more important than worrying about mash efficiency at this stage. Depending on the recipe, extract kits will typically come with a few specialty grains that will be crushed and steeped in the brew kettle prior to boiling to extract some additional flavor, as well as the yeast and any other adjuncts necessary.

Partial Mash

The partial mash is where some brewers typically dabble in mashing. This involves mashing about half of the grain bill in either a small cooler with a screened drain or in a bag in the brew kettle. The rest of the fermentable sugar is added as extract as before. This is a nice step because most people just getting into brewing don't have the capacity for large volumes of water and wort, and for the price of a mesh bag you can start brewing from grain and understanding the intricacies of starch conversion, efficiency, etc. We'll go into examples of this later.

All-Grain

This is where commercial brewing and homebrewing start to align. In all-grain brewing, you start with crushed base grain, specialty grains, and you create all the fermentable sugar for the wort by mashing. It's not really any different or more difficult than partial mashing, but it takes bigger equipment. The easiest way to start all-grain brewing is a technique called brew-in-a-bag, where you only have to have one large kettle and a 5 gallon paint strainer bag (and a good set of muscles or a pulley). All-grain brewing can be as simple or as complicated as you want, and the nice thing is that all the different setups make great beer.

The next obvious question is what equipment is necessary to start brewing. For simplicity's sake, we'll start with extract brewing, since you'll use most of this equipment for all the techniques.

This might be a good place to step back and say homebrewing is likely not going to be a good way to save money. Yes, over time your cost per bottle will be surprisingly low compared to prices in the store for similar beers, but you have to amortize the cost of the equipment you'll buy getting there. Right now I'm making beer at around $0.20 per bottle, but I take that with a grain of salt when I look at all the crap I've bought over the years. Hobbies cost money, no doubt, but how many hobbies also taste delicious?

Wednesday, January 11, 2012

Introduction

Over the past 6 years, I've learned a lot about good beer.

Craft brewing in the US and abroad has seen a boom, skyrocketing the meager number of breweries in the US from around 200 in the 1980's to 1759 in 2010. Though overall beer sales were down nation-wide last year, craft beer sales were up 15%, and import sales down 10%. What do these rough numbers mean? US beer drinkers want good, palatable beers in a variety of styles, and the US craft beer movement has answered that call.

Along with any industry seeing that kind of growth comes people like me, an amateur, trying to replicate that esoteric microbrew you found in that back of the shelf at the grocery store that made your taste buds go wild. Designing and brewing good beer isn't rocket science, it takes the simple skill of reading directions, paying close attention to details (or not), and more than anything...patience.

I started this blog for 2 main reasons. First, to put everything I know about brewing down on the Interweb to organize my thoughts. But also, every time a homebrewer makes a great beer, 10 others wonder "Can I do that too? Is it hard?" Kind of like when an angel gets it wings, but is too drunk to fly.

Now there is an almost unending list of books and resources on learning how to brew, and this is just another one, and in no way peer-reviewed. I'll include links to books and sites that dive a little deeper into each aspect of the process. The nice thing about a blog, however, is that it has the ability to change with the times. I'll be posting tips, new products, cool gadgets, beer related news, and of course my search for that perfect recipe. I am a believer that no one can really become a "master" brewer (certainly not the homebrewer) because what we thought was science changes, we learn new things about these techniques, people debunk myths, and new styles are born all the time. I am just another guy who likes to sit back and enjoy a good beer, and this is one way to do that.

The first thing on the agenda for this blog is outlining all the parts of the brew process, from the 100,000 ft view down to the minutia that makes your homebrew yours.